构建一个使用 Spring AI 基于 Qdrant 中存储的文档来回答问题的 Kotlin 应用——教程
In this tutorial, you'll learn how to build a Kotlin app that uses Spring AI to connect to an LLM, store documents in a vector database, and answer questions using context from those documents.
You will use the following tools during this tutorial:
- Spring Boot as the base to configure and run the web application.
- Spring AI to interact with the LLM and perform context-based retrieval.
- IntelliJ IDEA to generate the project and implement the application logic.
- Qdrant as the vector database for similarity search.
- Docker to run Qdrant locally.
- OpenAI as the LLM provider.
开始之前
Download and install the latest version of IntelliJ IDEA Ultimate Edition.
If you use IntelliJ IDEA Community Edition or another IDE, you can generate a Spring Boot project using a web-based project generator.
Create an OpenAI API key on the OpenAI platform to access the API.
- Install Docker to run the Qdrant vector database locally.
After installing Docker, open your terminal and run the following command to start the container:
docker run -p 6333:6333 -p 6334:6334 qdrant/qdrant
创建项目
You can use Spring Boot web-based project generator as an alternative to generate your project.
Create a new Spring Boot project in IntelliJ IDEA Ultimate Edition:
- In IntelliJ IDEA, select File | New | Project.
- In the panel on the left, select New Project | Spring Boot.
Specify the following fields and options in the New Project window:
- Name: springAIDemo
- Language: Kotlin
Type: Gradle - Kotlin
This option specifies the build system and the DSL.
Package name: com.example.springaidemo
JDK: Java JDK
This tutorial uses Oracle OpenJDK version 21.0.1. If you don't have a JDK installed, you can download it from the dropdown list.
Java: 17
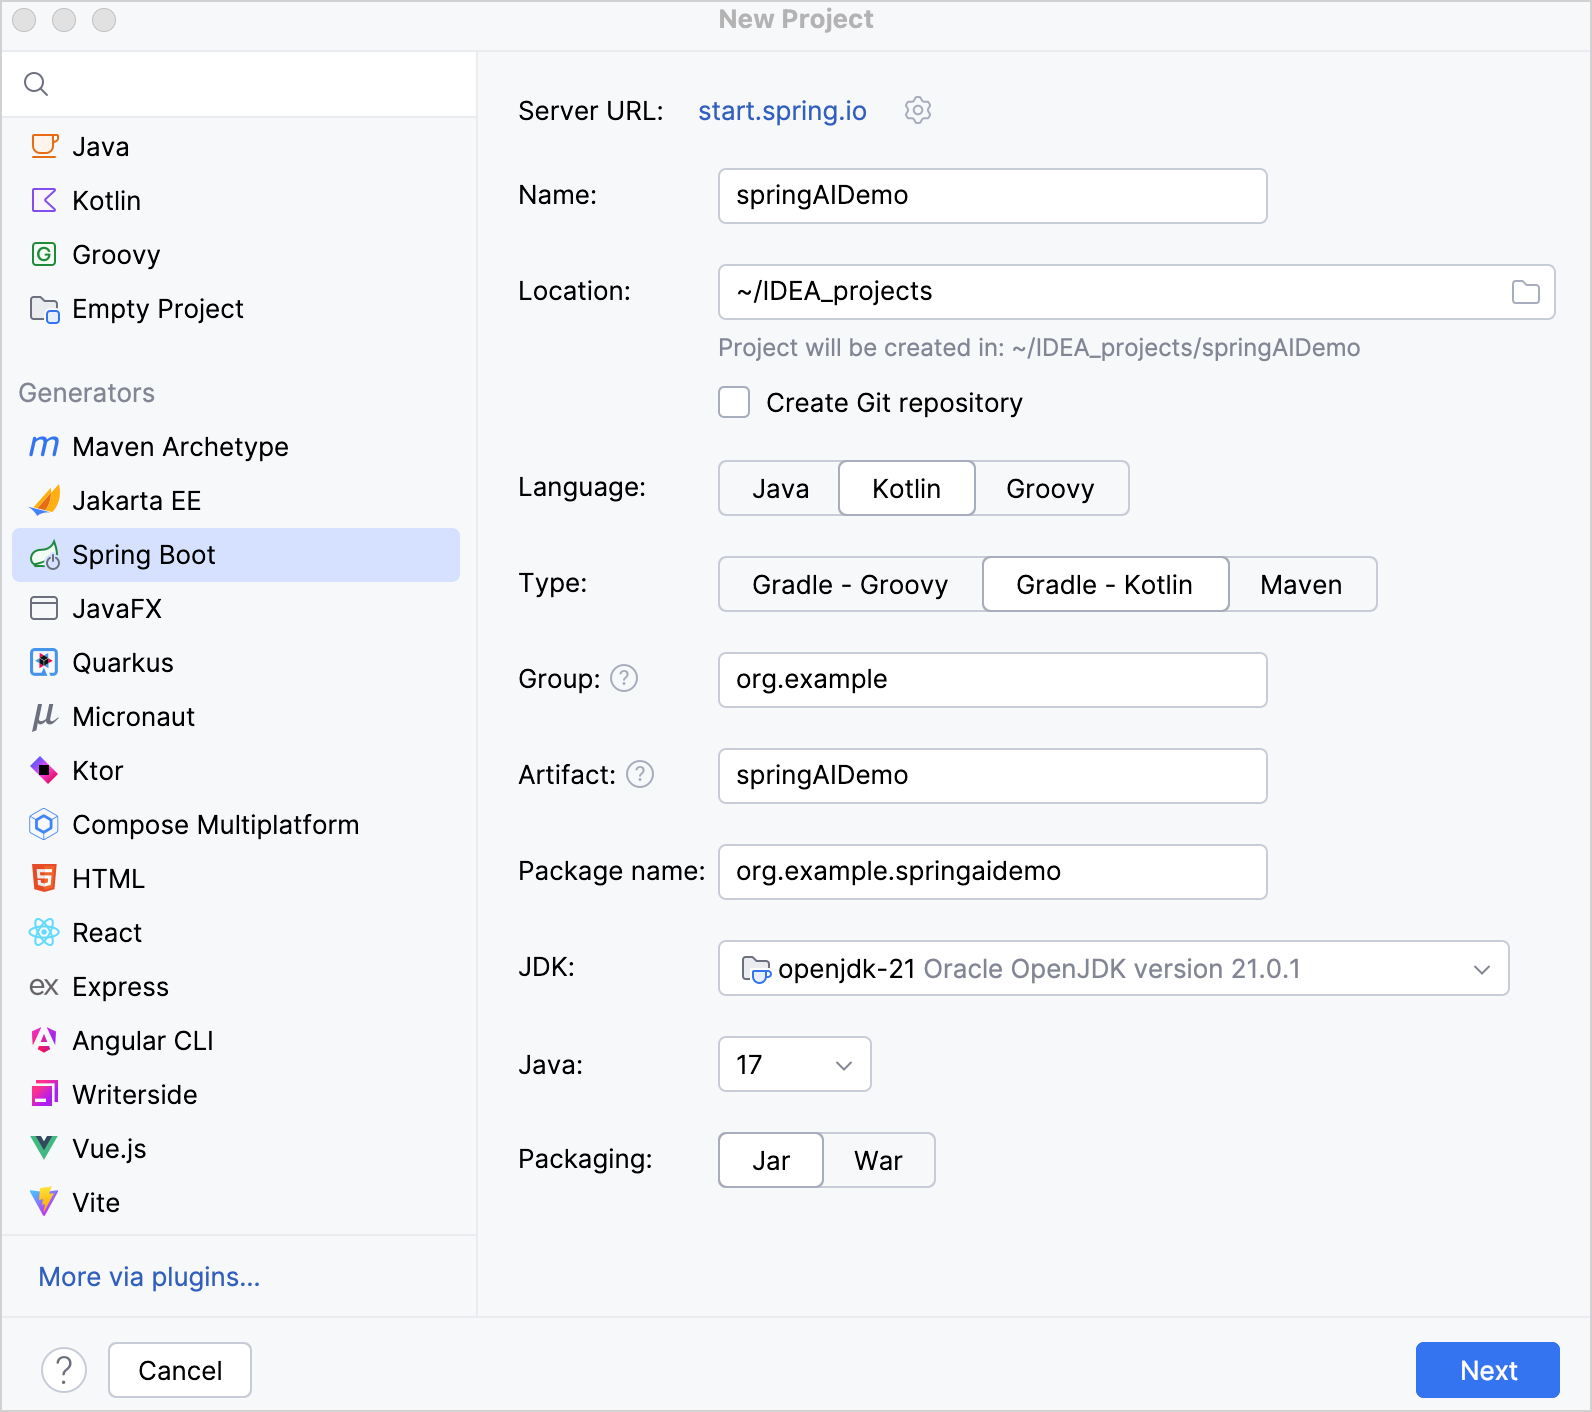
Make sure that you have specified all the fields and click Next.
Select the latest stable Spring Boot version in the Spring Boot field.
Select the following dependencies required for this tutorial:
- Web | Spring Web
- AI | OpenAI
- SQL | Qdrant Vector Database
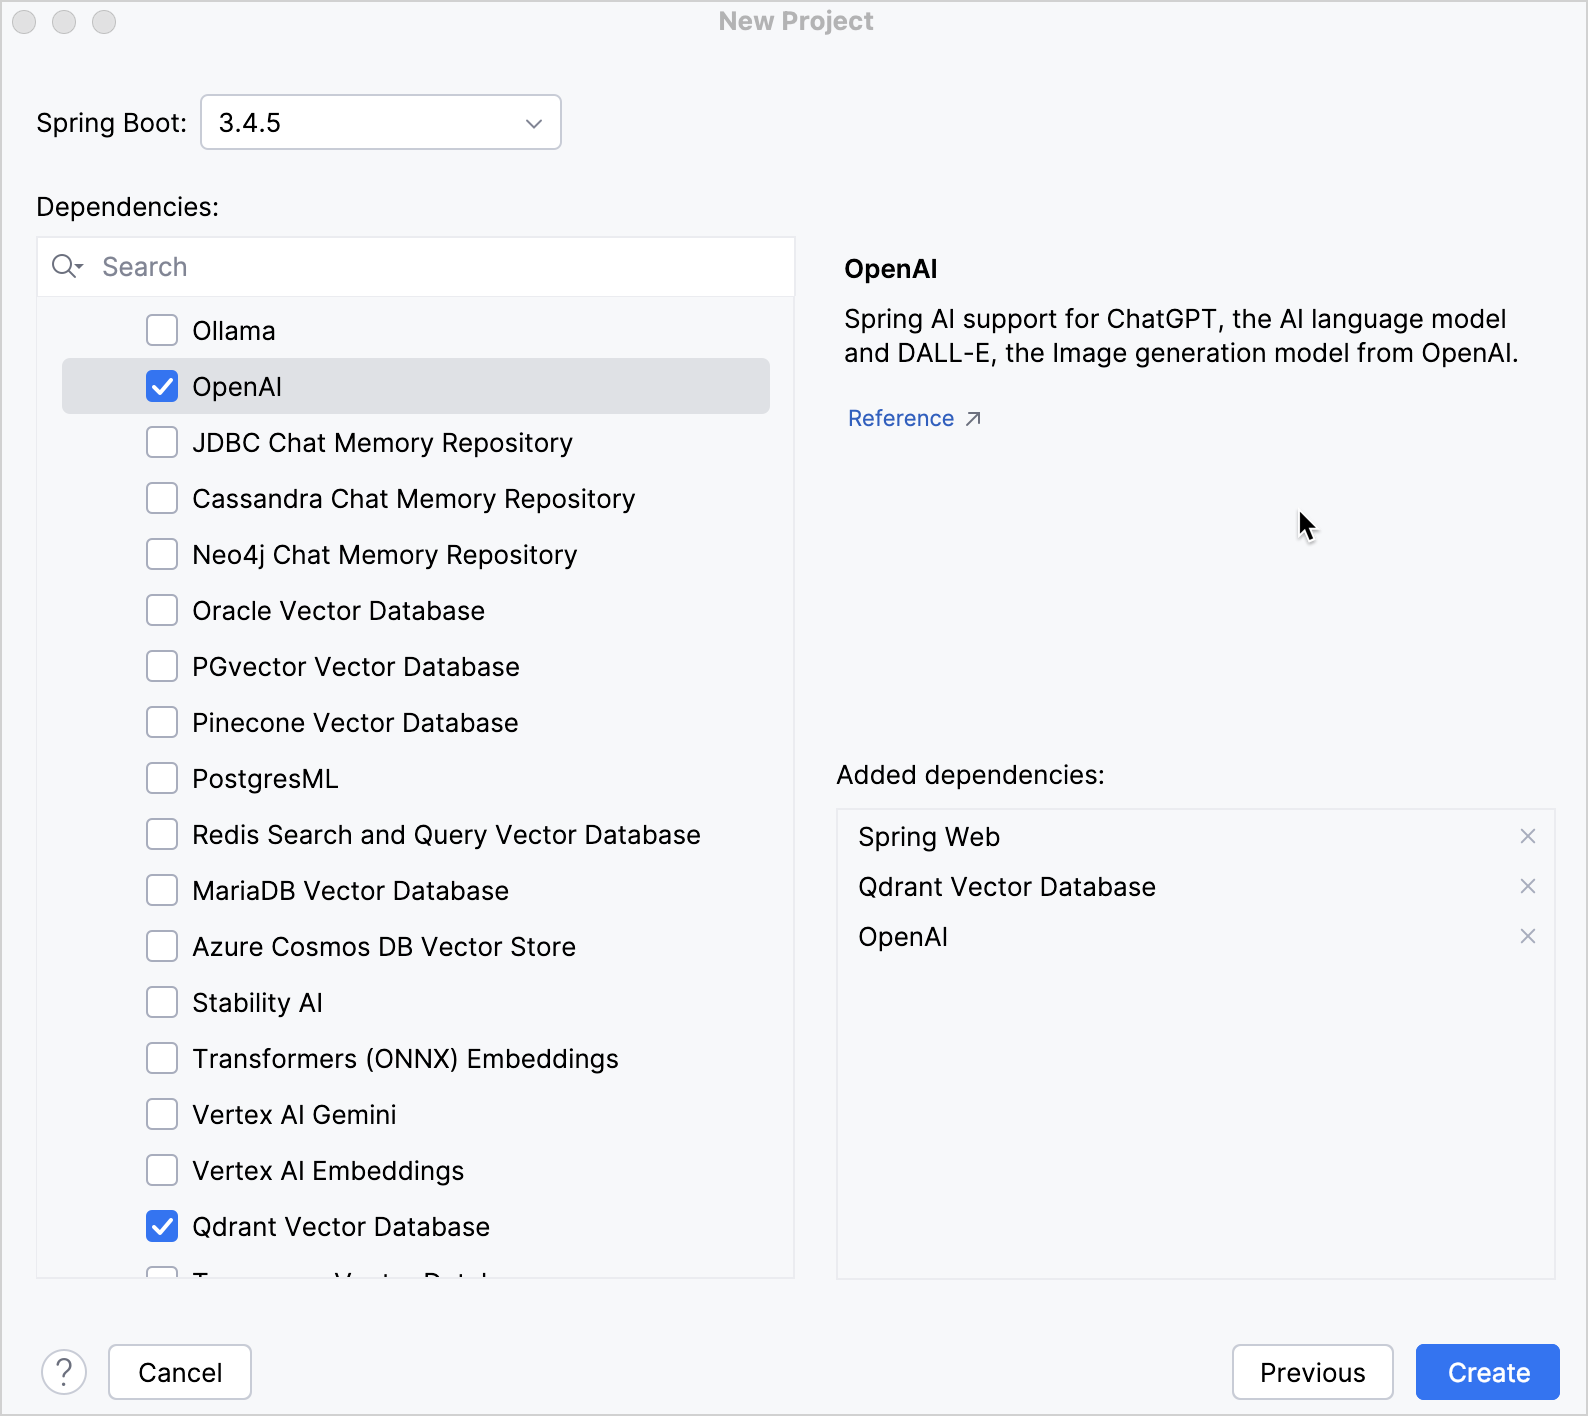
Click Create to generate and set up the project.
The IDE will generate and open a new project. It may take some time to download and import the project dependencies.
After this, you can see the following structure in the Project view:
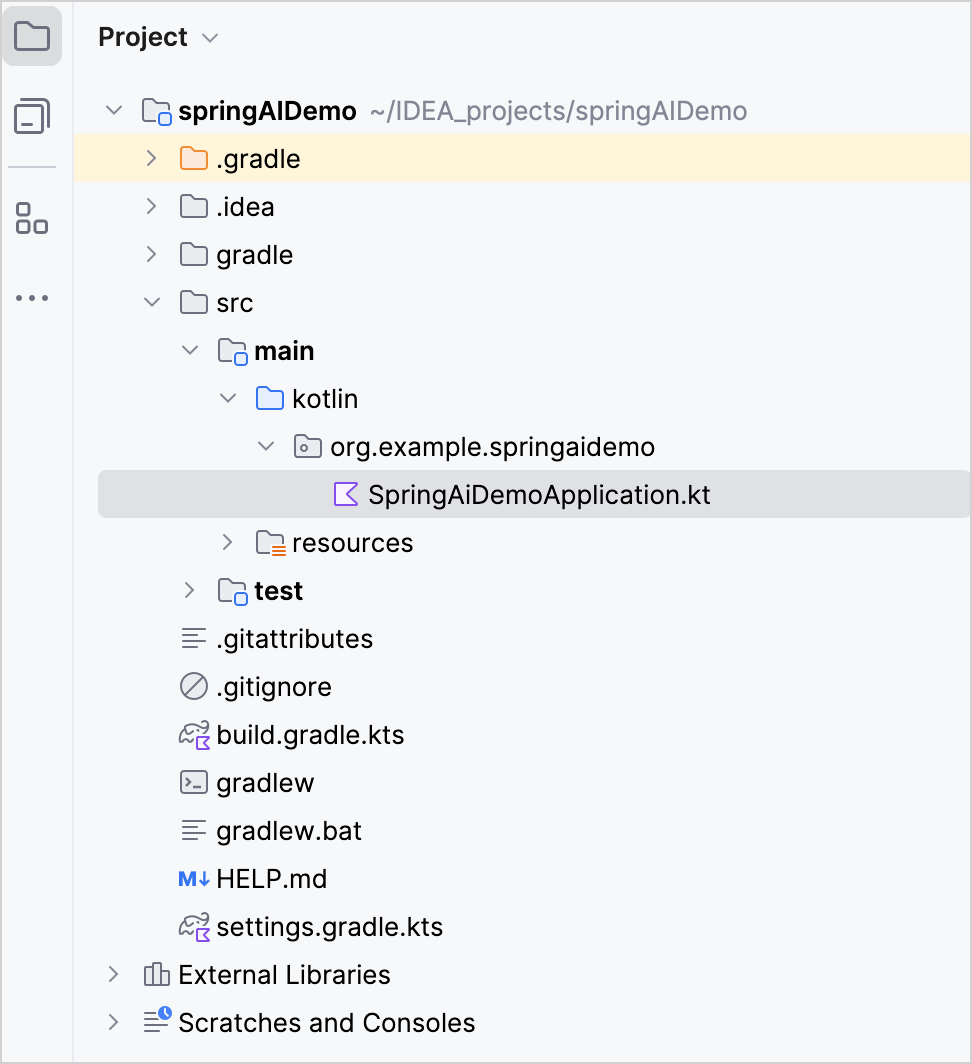
The generated Gradle project corresponds to the Maven's standard directory layout:
- There are packages and classes under the
main/kotlinfolder that belong to the application. - The entry point to the application is the
main()method of theSpringAiDemoApplication.ktfile.
更新项目配置
Update your
build.gradle.ktsGradle build file with the following:plugins { kotlin("jvm") version "2.1.21" kotlin("plugin.spring") version "2.1.21" // Rest of the plugins }Update your
springAiVersionto1.0.0-M6:extra["springAiVersion"] = "1.0.0-M6"Click the Sync Gradle Changes button to synchronize the Gradle files.
Update your
src/main/resources/application.propertiesfile with the following:# OpenAI spring.ai.openai.api-key=YOUR_OPENAI_API_KEY spring.ai.openai.chat.options.model=gpt-4o-mini spring.ai.openai.embedding.options.model=text-embedding-ada-002 # Qdrant spring.ai.vectorstore.qdrant.host=localhost spring.ai.vectorstore.qdrant.port=6334 spring.ai.vectorstore.qdrant.collection-name=kotlinDocs spring.ai.vectorstore.qdrant.initialize-schema=trueSet your OpenAI API key to the
spring.ai.openai.api-keyproperty.Run the
SpringAiDemoApplication.ktfile to start the Spring Boot application. Once it's running, open the Qdrant collections page in your browser to see the result: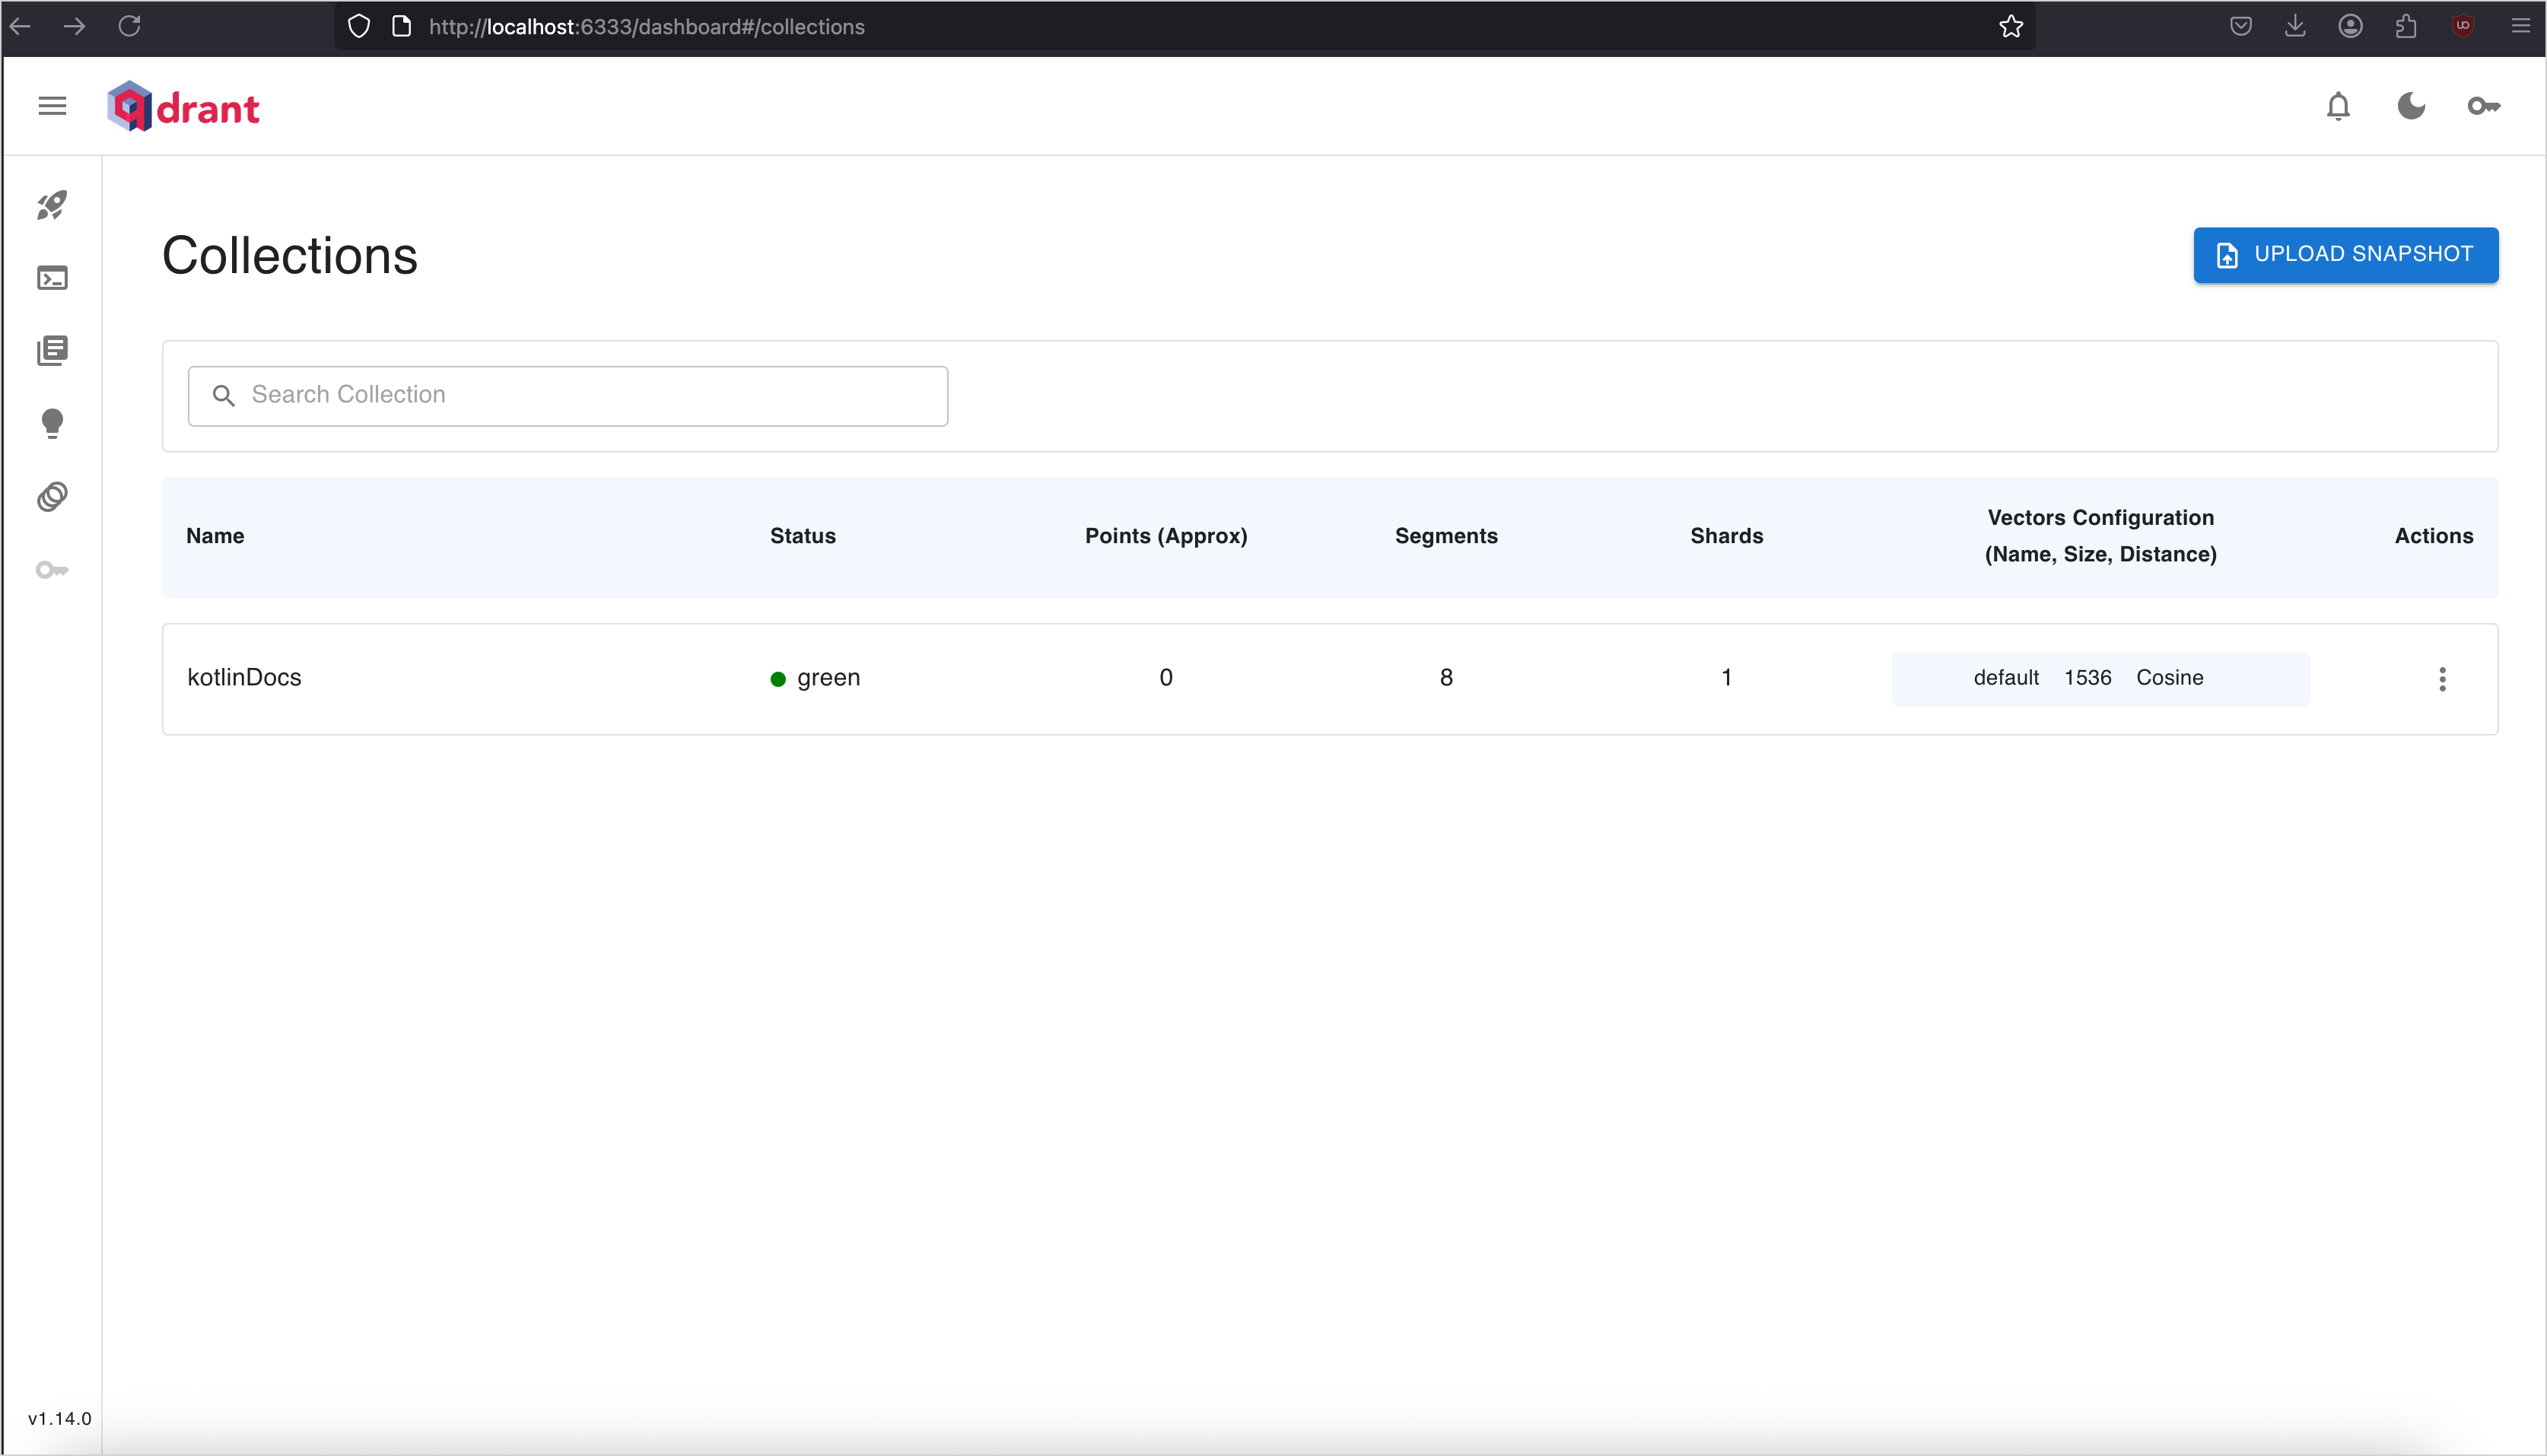
创建一个 controller 来加载并搜索文档
Create a Spring @RestController to search documents and store them in the Qdrant collection:
In the
src/main/kotlin/org/example/springaidemodirectory, create a new file namedKotlinSTDController.kt, and add the following code:package org.example.springaidemo // Imports the required Spring and utility classes import org.slf4j.LoggerFactory import org.springframework.ai.document.Document import org.springframework.ai.vectorstore.SearchRequest import org.springframework.ai.vectorstore.VectorStore import org.springframework.web.bind.annotation.GetMapping import org.springframework.web.bind.annotation.PostMapping import org.springframework.web.bind.annotation.RequestMapping import org.springframework.web.bind.annotation.RequestParam import org.springframework.web.bind.annotation.RestController import org.springframework.web.client.RestTemplate import kotlin.uuid.ExperimentalUuidApi import kotlin.uuid.Uuid // Data class representing the chat request payload data class ChatRequest(val query: String, val topK: Int = 3) @RestController @RequestMapping("/kotlin") class KotlinSTDController( private val restTemplate: RestTemplate, private val vectorStore: VectorStore, ) { private val logger = LoggerFactory.getLogger(this::class.java) @OptIn(ExperimentalUuidApi::class) @PostMapping("/load-docs") fun load() { // Loads a list of documents from the Kotlin documentation val kotlinStdTopics = listOf( "collections-overview", "constructing-collections", "iterators", "ranges", "sequences", "collection-operations", "collection-transformations", "collection-filtering", "collection-plus-minus", "collection-grouping", "collection-parts", "collection-elements", "collection-ordering", "collection-aggregate", "collection-write", "list-operations", "set-operations", "map-operations", "read-standard-input", "opt-in-requirements", "scope-functions", "time-measurement", ) // Base URL for the documents val url = "https://raw.githubusercontent.com/JetBrains/kotlin-web-site/refs/heads/master/docs/topics/" // Retrieves each document from the URL and adds it to the vector store kotlinStdTopics.forEach { topic -> val data = restTemplate.getForObject("$url$topic.md", String::class.java) data?.let { it -> val doc = Document.builder() // Builds a document with a random UUID .id(Uuid.random().toString()) .text(it) .metadata("topic", topic) .build() vectorStore.add(listOf(doc)) logger.info("Document $topic loaded.") } ?: logger.warn("Failed to load document for topic: $topic") } } @GetMapping("docs") fun query( @RequestParam query: String = "operations, filtering, and transformations", @RequestParam topK: Int = 2 ): List<Document>? { val searchRequest = SearchRequest.builder() .query(query) .topK(topK) .build() val results = vectorStore.similaritySearch(searchRequest) logger.info("Found ${results?.size ?: 0} documents for query: '$query'") return results } }{collapsible="true"}
Update the
SpringAiDemoApplication.ktfile to declare aRestTemplatebean:package org.example.springaidemo import org.springframework.boot.autoconfigure.SpringBootApplication import org.springframework.boot.runApplication import org.springframework.context.annotation.Bean import org.springframework.web.client.RestTemplate @SpringBootApplication class SpringAiDemoApplication { @Bean fun restTemplate(): RestTemplate = RestTemplate() } fun main(args: Array<String>) { runApplication<SpringAiDemoApplication>(*args) }{collapsible="true"}
Run the application.
In the terminal, send a POST request to the
/kotlin/load-docsendpoint to load the documents:curl -X POST http://localhost:8080/kotlin/load-docsOnce the documents are loaded, you can search for them with a GET request:
curl -X GET http://localhost:8080/kotlin/docs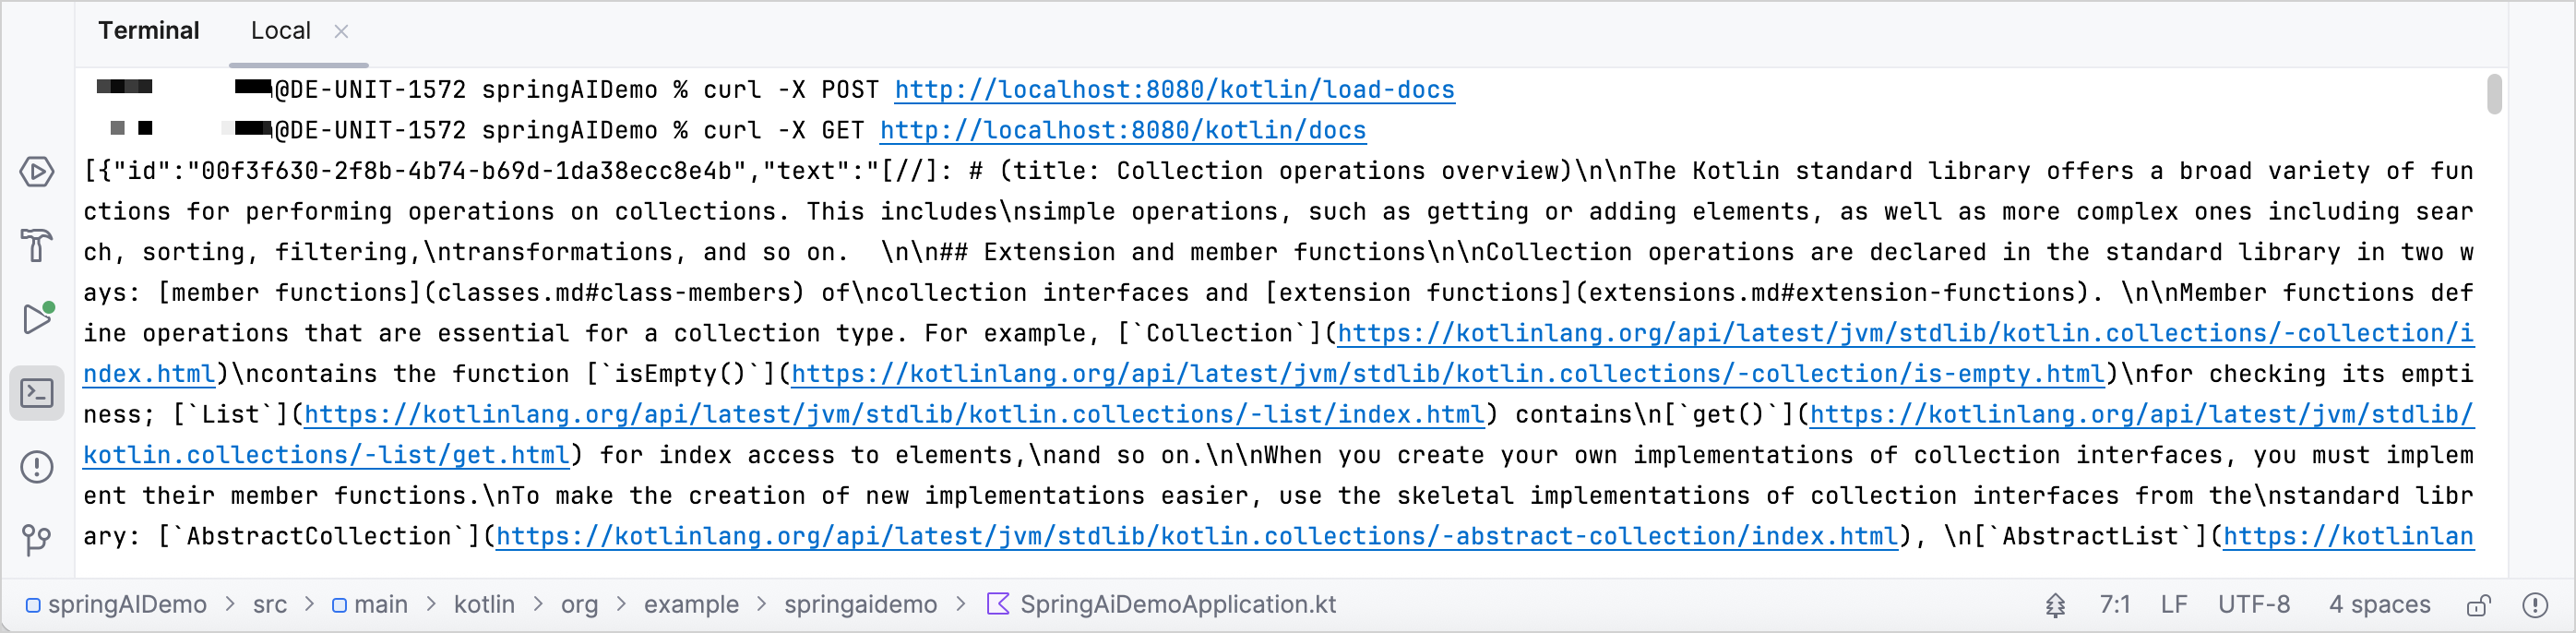
You can also view the results on the Qdrant collections page.
实现 AI 聊天端点
Once the documents are loaded, the final step is to add an endpoint that answers questions using the documents in Qdrant through Spring AI's Retrieval-Augmented Generation (RAG) support:
Open the
KotlinSTDController.ktfile, and import the following classes:import org.springframework.ai.chat.client.ChatClient import org.springframework.ai.chat.client.advisor.RetrievalAugmentationAdvisor import org.springframework.ai.chat.client.advisor.SimpleLoggerAdvisor import org.springframework.ai.chat.prompt.Prompt import org.springframework.ai.chat.prompt.PromptTemplate import org.springframework.ai.rag.preretrieval.query.transformation.RewriteQueryTransformer import org.springframework.ai.rag.retrieval.search.VectorStoreDocumentRetriever import org.springframework.web.bind.annotation.RequestBodyAdd
ChatClient.Builderto the controller's constructor parameters:class KotlinSTDController( private val chatClientBuilder: ChatClient.Builder, private val restTemplate: RestTemplate, private val vectorStore: VectorStore, )Inside the controller class, create a
ChatClientinstance and a query transformer:// Builds the chat client with a simple logging advisor private val chatClient = chatClientBuilder.defaultAdvisors(SimpleLoggerAdvisor()).build() // Builds the query transformer used to rewrite the input query private val rqtBuilder = RewriteQueryTransformer.builder().chatClientBuilder(chatClientBuilder)At the bottom of your
KotlinSTDController.ktfile, add a newchatAsk()endpoint, with the following logic:@PostMapping("/chat/ask") fun chatAsk(@RequestBody request: ChatRequest): String? { // Defines the prompt template with placeholders val promptTemplate = PromptTemplate( """ {query}. Please provide a concise answer based on the {target} documentation. """.trimIndent() ) // Creates the prompt by substituting placeholders with actual values val prompt: Prompt = promptTemplate.create(mapOf("query" to request.query, "target" to "Kotlin standard library")) // Configures the retrieval advisor to augment the query with relevant documents val retrievalAdvisor = RetrievalAugmentationAdvisor.builder() .documentRetriever( VectorStoreDocumentRetriever.builder() .similarityThreshold(0.7) .topK(request.topK) .vectorStore(vectorStore) .build() ) .queryTransformers(rqtBuilder.promptTemplate(promptTemplate).build()) .build() // Sends the prompt to the LLM with the retrieval advisor and get the response val response = chatClient.prompt(prompt) .advisors(retrievalAdvisor) .call() .content() logger.info("Chat response generated for query: '${request.query}'") return response }Run the application.
In the terminal, send a POST request to the new endpoint to see the results:
curl -X POST "http://localhost:8080/kotlin/chat/ask" \
     -H "Content-Type: application/json" \
     -d '{"query": "What are the performance implications of using lazy sequences in Kotlin for large datasets?", "topK": 3}'
Congratulations! You now have a Kotlin app that connects to OpenAI and answers questions using context retrieved from documentation stored in Qdrant. Try experimenting with different queries or importing other documents to explore more possibilities.
You can view the completed project in the Spring AI demo GitHub repository, or explore other Spring AI examples in Kotlin AI Examples.